![](https://i0.wp.com/tas400kt.xyz/wp-content/uploads/2021/05/024-1.jpg?resize=1024%2C632&ssl=1)
続き。集合部分を作っていきます。
まず、集合先の位置と直径をスケッチ。
![](https://i0.wp.com/tas400kt.xyz/wp-content/uploads/2021/05/036.jpg?resize=1024%2C643&ssl=1)
集合部分の角度を決めるために断面のスケッチを追加。
![](https://i0.wp.com/tas400kt.xyz/wp-content/uploads/2021/05/037.jpg?resize=1024%2C538&ssl=1)
![](https://i0.wp.com/tas400kt.xyz/wp-content/uploads/2021/05/038.jpg?resize=1024%2C571&ssl=1)
真上から見た感じ。
![](https://i0.wp.com/tas400kt.xyz/wp-content/uploads/2021/05/039.jpg?resize=1024%2C615&ssl=1)
傾きを埋めるための部分を生成。
![](https://i0.wp.com/tas400kt.xyz/wp-content/uploads/2021/05/041jpg.jpg?resize=1024%2C565&ssl=1)
押し出しで範囲タイプを「オブジェクト」に設定し、接合面の平面を指定します。
![](https://i0.wp.com/tas400kt.xyz/wp-content/uploads/2021/05/042.jpg?resize=375%2C515&ssl=1)
接合面の平面は「構築→2つのエッジを通過する面」で作成した物。
![](https://i0.wp.com/tas400kt.xyz/wp-content/uploads/2021/05/040.jpg?resize=1024%2C571&ssl=1)
一つ生成したら、円形状パターンでコピーします。
![](https://i0.wp.com/tas400kt.xyz/wp-content/uploads/2021/05/043.jpg?resize=1024%2C625&ssl=1)
傾斜部分のパイプを生成するために、集合先にスケッチを起こします。
![](https://i0.wp.com/tas400kt.xyz/wp-content/uploads/2021/05/044.jpg?resize=1024%2C539&ssl=1)
そこから、先程の接合面の平面に向かって押し出しで作成。
![](https://i0.wp.com/tas400kt.xyz/wp-content/uploads/2021/05/045.jpg?resize=1024%2C530&ssl=1)
そしてこれも円形状パターンでコピー。
重なっている所は後でくり抜きます。
![](https://i0.wp.com/tas400kt.xyz/wp-content/uploads/2021/05/046-1.jpg?resize=1024%2C528&ssl=1)
集合先の分を「回転」で生成。
![](https://i0.wp.com/tas400kt.xyz/wp-content/uploads/2021/05/047-1.jpg?resize=1024%2C468&ssl=1)
回転元の形状はこれを指定。
![](https://i0.wp.com/tas400kt.xyz/wp-content/uploads/2021/05/048.jpg?resize=1024%2C535&ssl=1)
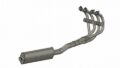
実際のBANDIT用のサイクロンは↓の様な感じで3Dデータ化するには少し面倒な形状なので上記の様な感じで成型しています。
FUSION360のスカルプドを自在に操る事が出来ればそんなに手間ではないのかもしれませんが・・・
![](https://i0.wp.com/tas400kt.xyz/wp-content/uploads/2021/05/i-img1024x768-1581840521pln6af195630-2.jpg?resize=780%2C501&ssl=1)
集合部分を溶接で作成してる物はいくつかのパターンが有りますが、↓最後のヤツは特に美しいですねぇ。
![](https://i0.wp.com/tas400kt.xyz/wp-content/uploads/2021/05/0920155151_59c2100711a5b.jpg?resize=380%2C315&ssl=1)
![](https://i0.wp.com/tas400kt.xyz/wp-content/uploads/2021/05/custom-faq_muffler_12.jpg?resize=696%2C464&ssl=1)
![](https://i0.wp.com/tas400kt.xyz/wp-content/uploads/2021/05/EUcUxF-VAAIubEh.jpg?resize=1024%2C768&ssl=1)
![](https://i0.wp.com/tas400kt.xyz/wp-content/uploads/2021/05/detail14_b.jpg?resize=950%2C630&ssl=1)
で、次は中身をくり抜いていきます。
まず一個くり抜きます。
![](https://i0.wp.com/tas400kt.xyz/wp-content/uploads/2021/05/049.jpg?resize=1024%2C535&ssl=1)
そしてこれを円形状パターンにフィーチャーを指定して他の3箇所をくり抜こうとしたのですが
![](https://i0.wp.com/tas400kt.xyz/wp-content/uploads/2021/05/050.jpg?resize=1024%2C593&ssl=1)
領域が重なっているためか上手くいきまん。
![](https://i0.wp.com/tas400kt.xyz/wp-content/uploads/2021/05/051.jpg?resize=1024%2C615&ssl=1)
なので一個ずつくり抜いていきます。
スケッチする平面を作成するのが面倒なので、ダミーのボディを生成してその平面を利用します。
![](https://i0.wp.com/tas400kt.xyz/wp-content/uploads/2021/05/052.jpg?resize=1024%2C583&ssl=1)
![](https://i0.wp.com/tas400kt.xyz/wp-content/uploads/2021/05/053.jpg?resize=1024%2C558&ssl=1)
スケッチを作成したらダミーのボディは「除去」で消しておきます。
「削除」は参照元の寸法が消えるので不可です。
![](https://i0.wp.com/tas400kt.xyz/wp-content/uploads/2021/05/055.jpg?resize=1024%2C556&ssl=1)
![](https://i0.wp.com/tas400kt.xyz/wp-content/uploads/2021/05/054.jpg?resize=1024%2C664&ssl=1)
で、追加した各スケッチを利用して押し出しで切り取って行けば、当然綺麗にくり抜けます。
![](https://i0.wp.com/tas400kt.xyz/wp-content/uploads/2021/05/056jpg.jpg?resize=1024%2C612&ssl=1)
コーン形状部分の内側の不要な部分も削ります。
![](https://i0.wp.com/tas400kt.xyz/wp-content/uploads/2021/05/061.jpg?resize=1024%2C555&ssl=1)
中心の突出部分を削ってしまわない様にスケッチを調整して回転で削除。
![](https://i0.wp.com/tas400kt.xyz/wp-content/uploads/2021/05/057-1.jpg?resize=1024%2C552&ssl=1)
![](https://i0.wp.com/tas400kt.xyz/wp-content/uploads/2021/05/058.jpg?resize=1024%2C640&ssl=1)
エキパイ側のコーン状部分の不要部分が切り抜きにより別ボディになっていたのでこれも除去しておきます。
![](https://i0.wp.com/tas400kt.xyz/wp-content/uploads/2021/05/059.jpg?resize=1024%2C573&ssl=1)
スッキリw
![](https://i0.wp.com/tas400kt.xyz/wp-content/uploads/2021/05/060.jpg?resize=1024%2C596&ssl=1)
これで集合部分は完成。
![](https://i0.wp.com/tas400kt.xyz/wp-content/uploads/2021/05/062.jpg?resize=840%2C451&ssl=1)
![](https://i0.wp.com/tas400kt.xyz/wp-content/uploads/2021/05/063.jpg?resize=1024%2C621&ssl=1)
コメントを投稿するにはログインしてください。