![](https://i0.wp.com/tas400kt.xyz/wp-content/uploads/2021/06/0061.jpg?resize=1024%2C576&ssl=1)
TwitterのTLに流れててきた↓のツイートを見て面白そうだなと思って作ってみる事に。
↓元の動画
まず FM GEARS アドイン を使ってギアを一つ作成します。
動画をみるとツムジの様な箇所が円周上に4か所見えるので、4の倍数だろうという事で24丁に設定。
![](https://i0.wp.com/tas400kt.xyz/wp-content/uploads/2021/06/0071.jpg?resize=1024%2C576&ssl=1)
ツムジの中心がピン状になっていないのを再現するために歯のピッチの半分だけ回転させ、スケッチを作成してプロジェクトで歯型を転写し、後で削り行程で使うために歯径より大きい半円を書いておきます。
![](https://i0.wp.com/tas400kt.xyz/wp-content/uploads/2021/06/0081.jpg?resize=1024%2C576&ssl=1)
まず上半分を指定して回転。
![](https://i0.wp.com/tas400kt.xyz/wp-content/uploads/2021/06/0101.jpg?resize=1024%2C576&ssl=1)
次に、左半分の歯形の外側の領域を指定して回転させて削り取ります。
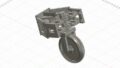
![](https://i0.wp.com/tas400kt.xyz/wp-content/uploads/2021/06/0111.jpg?resize=1024%2C576&ssl=1)
これで球形歯車の方は完成。
![](https://i0.wp.com/tas400kt.xyz/wp-content/uploads/2021/06/0121.jpg?resize=1024%2C576&ssl=1)
問題は小径の歯車の方。
正確な作り方が分からない(思い浮かばない)ので適当にやります(^^;
小径のギア(12丁)を FM GEARS で作成し、球形歯車に噛み合う位置に配置してスケッチに歯型を転写。
![](https://i0.wp.com/tas400kt.xyz/wp-content/uploads/2021/06/0131.jpg?resize=1024%2C576&ssl=1)
一歯分の位置に中心から線を引いて、その一歯分を球形歯車の中心線を指定して角度指定で回転させて一枚分の歯を作ります。
![](https://i0.wp.com/tas400kt.xyz/wp-content/uploads/2021/06/0151.jpg?resize=1024%2C576&ssl=1)
それを円形状パターンで歯数分配置し、
![](https://i0.wp.com/tas400kt.xyz/wp-content/uploads/2021/06/0141.jpg?resize=1024%2C576&ssl=1)
削り取り&隙間埋め用に一枚の断面を交差でスケッチに反映して線を追加し、
![](https://i0.wp.com/tas400kt.xyz/wp-content/uploads/2021/06/0161.jpg?resize=1024%2C576&ssl=1)
隙間を埋めて、
![](https://i0.wp.com/tas400kt.xyz/wp-content/uploads/2021/06/0171.jpg?resize=1024%2C576&ssl=1)
不要分を削除。
![](https://i0.wp.com/tas400kt.xyz/wp-content/uploads/2021/06/018.jpg?resize=1024%2C576&ssl=1)
ツムジになる2歯分を削除し、
![](https://i0.wp.com/tas400kt.xyz/wp-content/uploads/2021/06/019.jpg?resize=1024%2C576&ssl=1)
![](https://i0.wp.com/tas400kt.xyz/wp-content/uploads/2021/06/020.jpg?resize=1024%2C576&ssl=1)
ツムジを作成。
![](https://i0.wp.com/tas400kt.xyz/wp-content/uploads/2021/06/021.jpg?resize=1024%2C576&ssl=1)
小径歯車にに軸を追加して、円形状パターンで一つだけ90度方向にコピーして、見た目は完成。
![](https://i0.wp.com/tas400kt.xyz/wp-content/uploads/2021/06/022.jpg?resize=1024%2C576&ssl=1)
アニメーションをさせるにあたり、球形歯車の回転ジョイントをどうするかと少し考えて、ボールジョイントが有ったのを思い出して解決。
真ん中を球状に削って、別ボディで嵌る球を作成してボールジョイントを設定。
![](https://i0.wp.com/tas400kt.xyz/wp-content/uploads/2021/06/024.jpg?resize=1024%2C576&ssl=1)
![](https://i0.wp.com/tas400kt.xyz/wp-content/uploads/2021/06/023.jpg?resize=1024%2C576&ssl=1)
モーションスタディでそれっぽく見えるようにボールジョイントと小径歯車の回転ジョイントを設定。
![](https://i0.wp.com/tas400kt.xyz/wp-content/uploads/2021/06/001-1.jpg?resize=1024%2C373&ssl=1)
↓出来たアニメーション。
しかし、小径歯車の作り方がいい加減なので断面解析すると干渉しまくってます(^^;
![](https://i0.wp.com/tas400kt.xyz/wp-content/uploads/2021/06/002-1.jpg?resize=1024%2C791&ssl=1)
![](https://i0.wp.com/tas400kt.xyz/wp-content/uploads/2021/06/003-1.jpg?resize=1024%2C759&ssl=1)
![](https://i0.wp.com/tas400kt.xyz/wp-content/uploads/2021/06/004-1.jpg?resize=1024%2C756&ssl=1)
![](https://i0.wp.com/tas400kt.xyz/wp-content/uploads/2021/06/005-1.jpg?resize=1024%2C736&ssl=1)
そして、未だに元動画のように自在に回転出来るのかイメージはまったく掴めないです orz
コメントを投稿するにはログインしてください。