![](https://i0.wp.com/tas400kt.xyz/wp-content/uploads/2021/05/024-2.jpg?resize=1024%2C632&ssl=1)
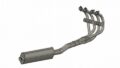
続き。デュプレックスチャンバーとテールパイプを作っていきます。
エキパイの裏?側、デュプレックスチャンバーとの接続部分にスケッチを作成。
![](https://i0.wp.com/tas400kt.xyz/wp-content/uploads/2021/05/064.jpg?resize=1024%2C554&ssl=1)
![](https://i0.wp.com/tas400kt.xyz/wp-content/uploads/2021/05/065.jpg?resize=1024%2C593&ssl=1)
更にデュプレックスチャンバー中心部とサイドのスケッチを追加。
![](https://i0.wp.com/tas400kt.xyz/wp-content/uploads/2021/05/066.jpg?resize=1024%2C580&ssl=1)
![](https://i0.wp.com/tas400kt.xyz/wp-content/uploads/2021/05/067.jpg?resize=1024%2C517&ssl=1)
チャンバー本体は断面を指定した回転で生成。
![](https://i0.wp.com/tas400kt.xyz/wp-content/uploads/2021/05/068.jpg?resize=1024%2C595&ssl=1)
![](https://i0.wp.com/tas400kt.xyz/wp-content/uploads/2021/05/069.jpg?resize=1024%2C570&ssl=1)
断面はこんな感じに。
![](https://i0.wp.com/tas400kt.xyz/wp-content/uploads/2021/05/070.jpg?resize=1024%2C655&ssl=1)
接続部のパッキンとワッシャー、手抜きで一体成型 (^^;
![](https://i0.wp.com/tas400kt.xyz/wp-content/uploads/2021/05/071.jpg?resize=1024%2C537&ssl=1)
押し出しで「開始」をエキパイの面を指定し、厚さを指定。
![](https://i0.wp.com/tas400kt.xyz/wp-content/uploads/2021/05/073.jpg?resize=375%2C515&ssl=1)
接続パイプを生成。
![](https://i0.wp.com/tas400kt.xyz/wp-content/uploads/2021/05/072.jpg?resize=1024%2C586&ssl=1)
エキパイを非表示にするとこんな感じ。
![](https://i0.wp.com/tas400kt.xyz/wp-content/uploads/2021/05/074.jpg?resize=1024%2C579&ssl=1)
断面。
![](https://i0.wp.com/tas400kt.xyz/wp-content/uploads/2021/05/075.jpg?resize=1024%2C636&ssl=1)
で、デュプレックスチャンバーは完成。
(本当は固定用のスプリングが有るんだけど省略 (^^; )
![](https://i0.wp.com/tas400kt.xyz/wp-content/uploads/2021/05/077.jpg?resize=840%2C474&ssl=1)
![](https://i0.wp.com/tas400kt.xyz/wp-content/uploads/2021/05/076.jpg?resize=1024%2C655&ssl=1)
次にテールパイプ。
まず、側面と上から見たスケッチを作成。
![](https://i0.wp.com/tas400kt.xyz/wp-content/uploads/2021/05/078.jpg?resize=1024%2C549&ssl=1)
![](https://i0.wp.com/tas400kt.xyz/wp-content/uploads/2021/05/079.jpg?resize=1024%2C498&ssl=1)
この記事書いてて気が付いたけど、スイングアームが有る事を全く考慮してませんね(^^;
サイレンサーの跳ね上げ角に合わせた面を構築してそこにスケッチを追加。
![](https://i0.wp.com/tas400kt.xyz/wp-content/uploads/2021/05/080.jpg?resize=1024%2C537&ssl=1)
後はエキパイと同じ様に曲げる部分に平面を起こしてスケッチを追加し、そのラインに沿ってスイープさせてパイプを生成します。
![](https://i0.wp.com/tas400kt.xyz/wp-content/uploads/2021/05/081.jpg?resize=1024%2C549&ssl=1)
![](https://i0.wp.com/tas400kt.xyz/wp-content/uploads/2021/05/082.jpg?resize=1024%2C554&ssl=1)
以上でテールパイプまで完成。
![](https://i0.wp.com/tas400kt.xyz/wp-content/uploads/2021/05/083.jpg?resize=1024%2C641&ssl=1)
![](https://i0.wp.com/tas400kt.xyz/wp-content/uploads/2021/05/084.jpg?resize=1024%2C556&ssl=1)
![](https://i0.wp.com/tas400kt.xyz/wp-content/uploads/2021/05/085.jpg?resize=1024%2C543&ssl=1)
コメントを投稿するにはログインしてください。